
System Design: Building a Production-Grade Distributed In-Memory Cache
Introduction
A distributed in-memory cache is no longer optional infrastructure for high-scale applications. It's the difference between serving user requests in milliseconds versus seconds, between handling traffic spikes gracefully versus cascading failures. Redis Cluster, one of the most widely deployed distributed caching systems, demonstrates how careful design choices around sharding, replication, and consistency create a system that can scale horizontally while maintaining operational simplicity.
This post examines the core system design decisions behind a production-grade distributed cache. We'll explore how consistent hashing enables dynamic cluster membership, how different eviction policies trade memory for hit rates, how asynchronous replication balances performance against durability, and how write strategies fundamentally alter your consistency guarantees. Each section includes concrete tradeoffs backed by Redis Cluster's architecture as a reference implementation.
Whether you're designing a new caching layer, debugging production cache behavior, or preparing for system design discussions, understanding these patterns will help you make informed decisions about one of the most critical components in modern distributed systems.
Consistent Hashing and Resharding
The Sharding Problem
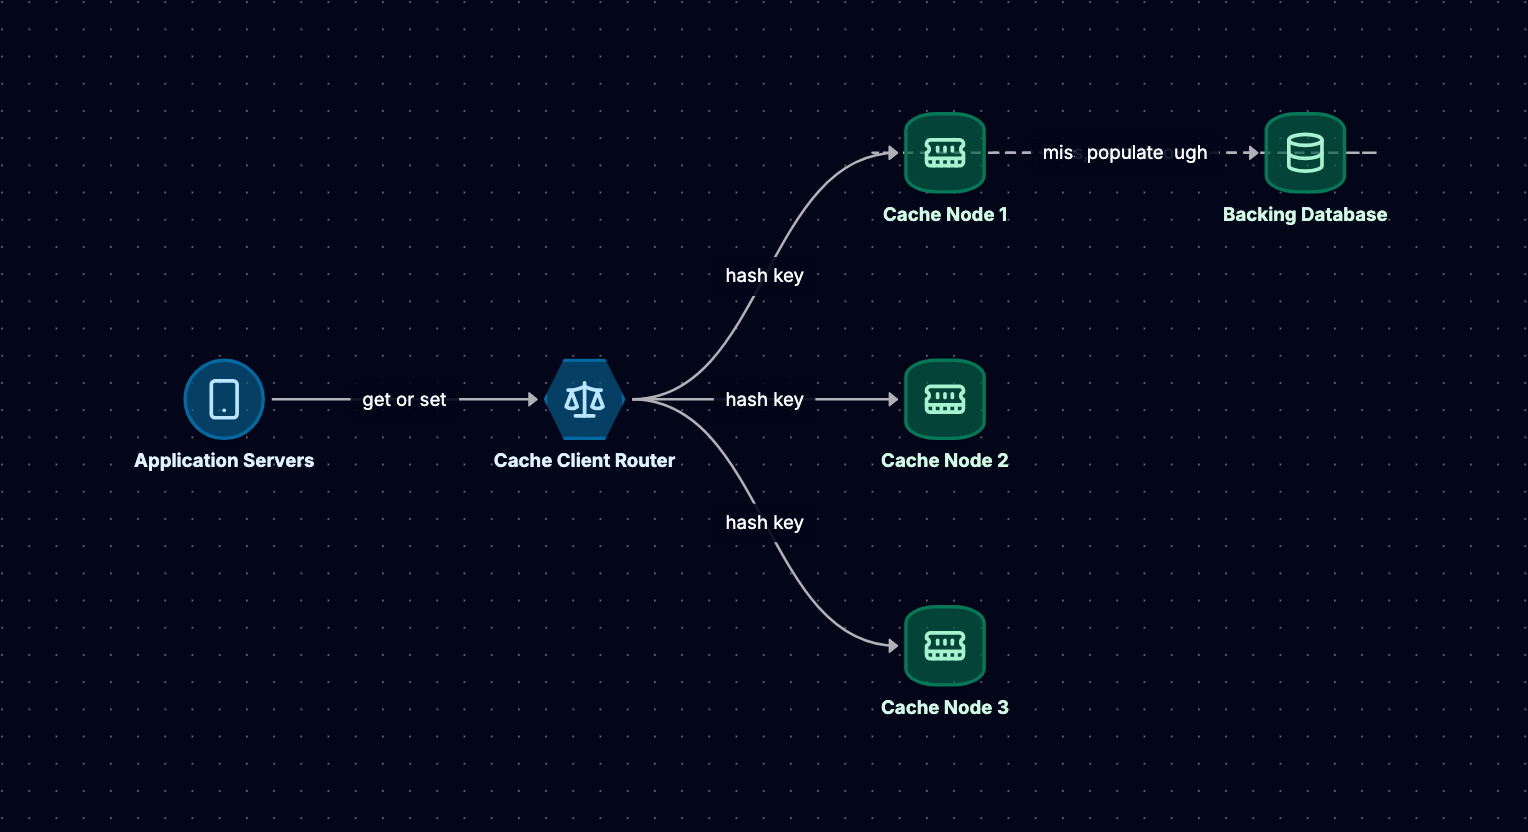
When a single cache node can no longer handle your workload, you need to distribute data across multiple nodes. The naive approach uses modulo hashing: node = hash(key) % node_count. This works until you add or remove nodes. Suddenly, most keys hash to different nodes, causing a cache stampede as the entire dataset effectively invalidates.
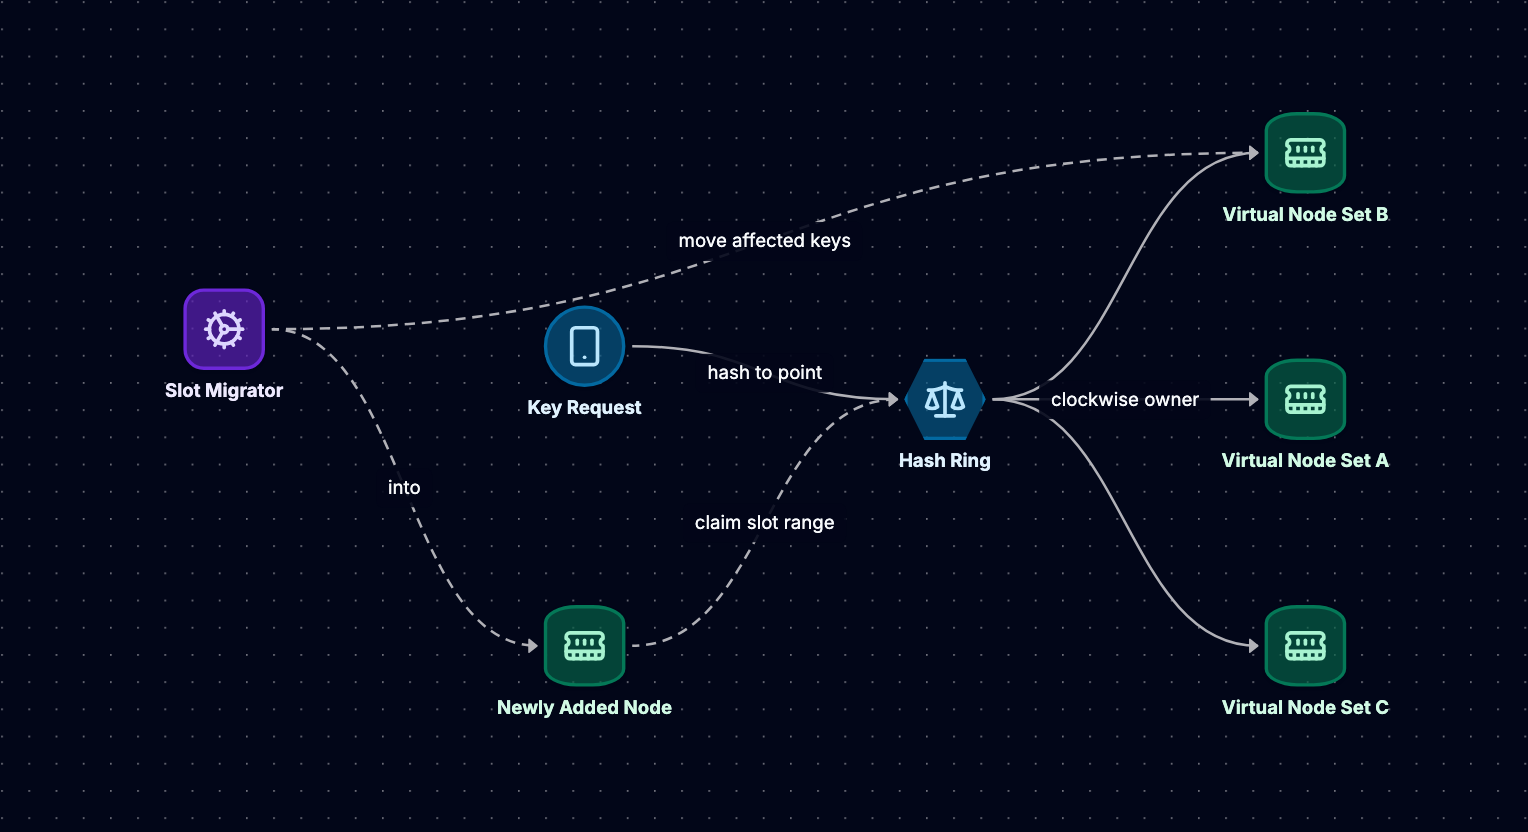
Consistent hashing solves this by minimizing key redistribution when the cluster topology changes. Instead of mapping keys directly to nodes, you map both keys and nodes onto a hash ring. Each key belongs to the first node encountered when moving clockwise around the ring.
Redis Cluster's Hash Slot Design
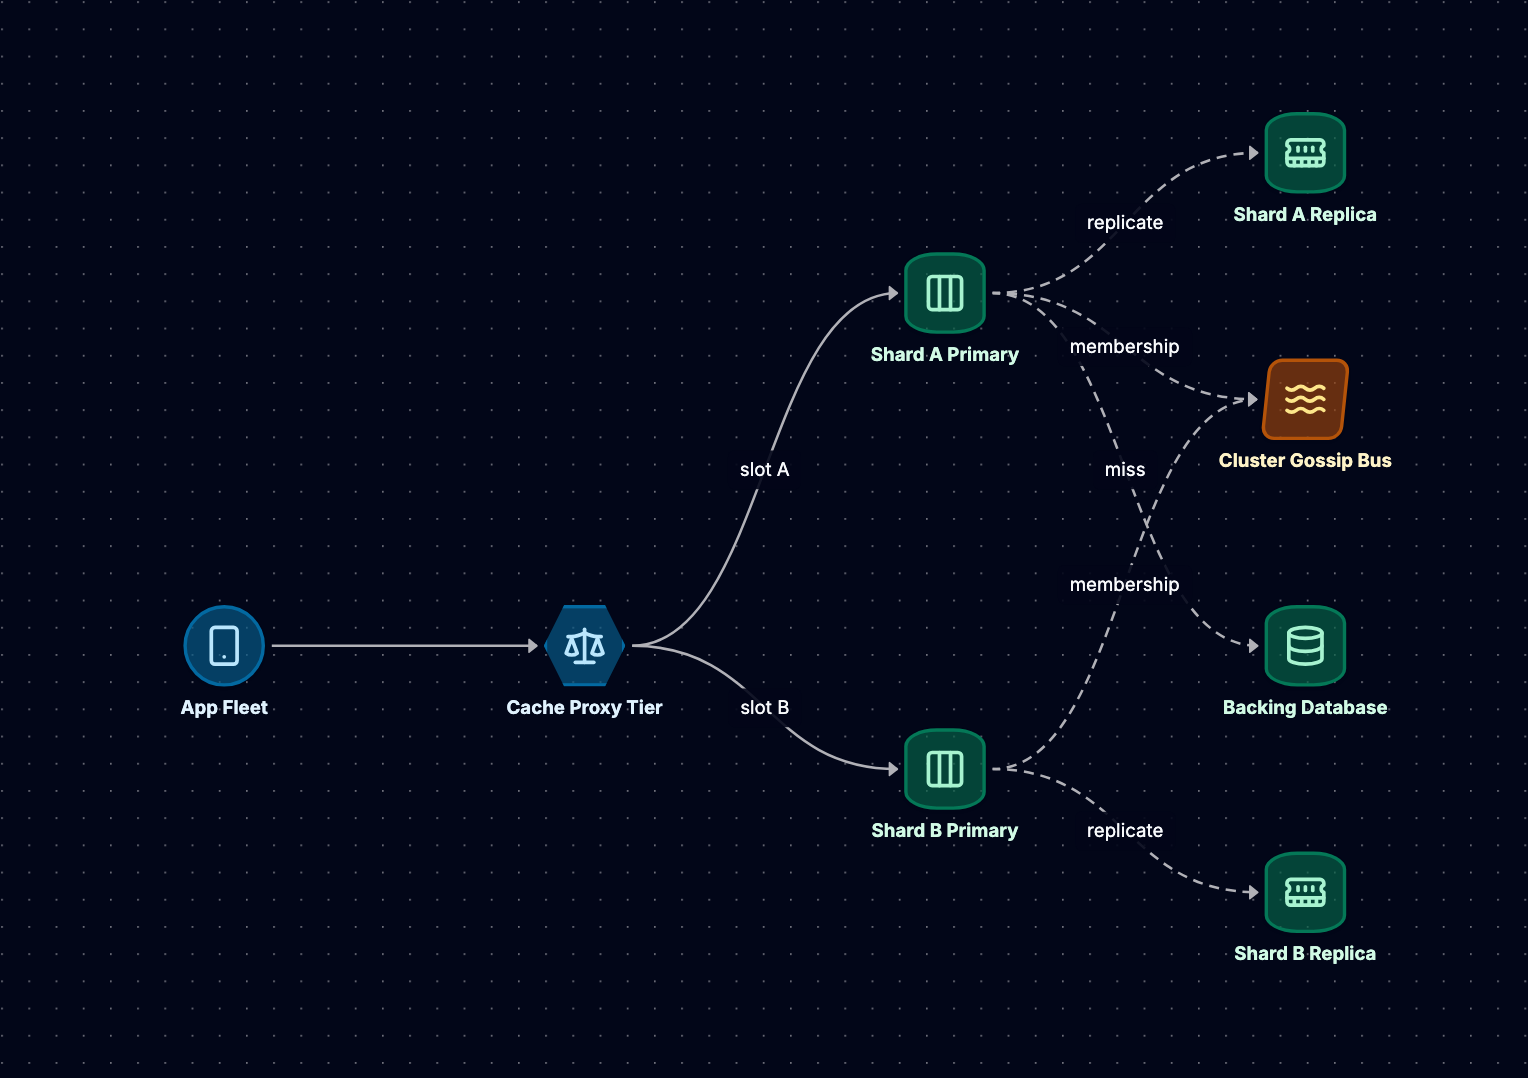
Redis Cluster takes a pragmatic approach by pre-sharding the keyspace into 16,384 fixed hash slots. According to the Redis Cluster specification, this number was chosen as a compromise: large enough to distribute load evenly across hundreds of nodes, small enough that cluster metadata (which nodes own which slots) remains compact for gossip protocol transmission.
slot = CRC16(key) & 16383
Every key maps to exactly one slot via CRC16 hashing. Master nodes claim ownership of slot ranges. For example, a three-node cluster might divide slots as:
Node A: slots 0-5460
Node B: slots 5461-10922
Node C: slots 10923-16383
This design decouples the number of shards (fixed at 16,384) from the number of physical nodes (variable). You can add nodes without rehashing every key; you simply migrate slot ownership.
Resharding Mechanics
When you add a new node to the cluster, Redis migrates entire slots atomically. The process for moving slot 100 from Node A to Node B:
- Node B marks slot 100 as "importing" from Node A
- Node A marks slot 100 as "migrating" to Node B
- Client requests for keys in slot 100 go to Node A (still the owner)
- Node A migrates keys one at a time using
MIGRATEcommands - Once all keys are transferred, cluster configuration updates to make Node B the owner
- Clients receive
MOVEDredirects to update their slot mappings
During migration, Node A returns -ASK redirects for keys it has already migrated, telling clients to try Node B for that specific key. This allows migration to proceed without blocking operations.
The atomic unit is the slot, not individual keys. This bounded scope makes migration predictable. Migrating 1,000 slots with 10,000 keys each is 1,000 independent operations, each completing in seconds to minutes depending on key sizes and cluster load.
Hash Tags for Multi-Key Operations
Sharding creates a fundamental constraint: operations spanning multiple keys only work if those keys live on the same node. Redis Cluster addresses this with hash tags. By default, the entire key is hashed, but if the key contains {...}, only the content inside braces is hashed:
user:1000:profile  → hashes "user:1000:profile"
user:{1000}:profile → hashes "1000"
user:{1000}:sessions → hashes "1000"
Both keys with {1000} land in the same slot, enabling MGET, MSET, and transactions across them. This pattern requires application-level awareness but preserves sharding benefits while supporting related-key operations.
Virtual Nodes and Load Distribution
Pure consistent hashing can create load imbalances when nodes have heterogeneous capacity. Virtual nodes (vnodes) address this by mapping each physical node to multiple points on the hash ring. A machine with twice the memory might claim twice as many vnodes, receiving proportionally more slots.
Redis Cluster doesn't implement vnodes directly since slots are manually assigned. However, you can achieve the same effect by assigning more slots to larger nodes during initial cluster setup or resharding. The fixed slot count makes this manual process tractable compared to systems with millions of vnodes.
Eviction Policies: LRU, LFU, and TTL
Memory as a Finite Resource
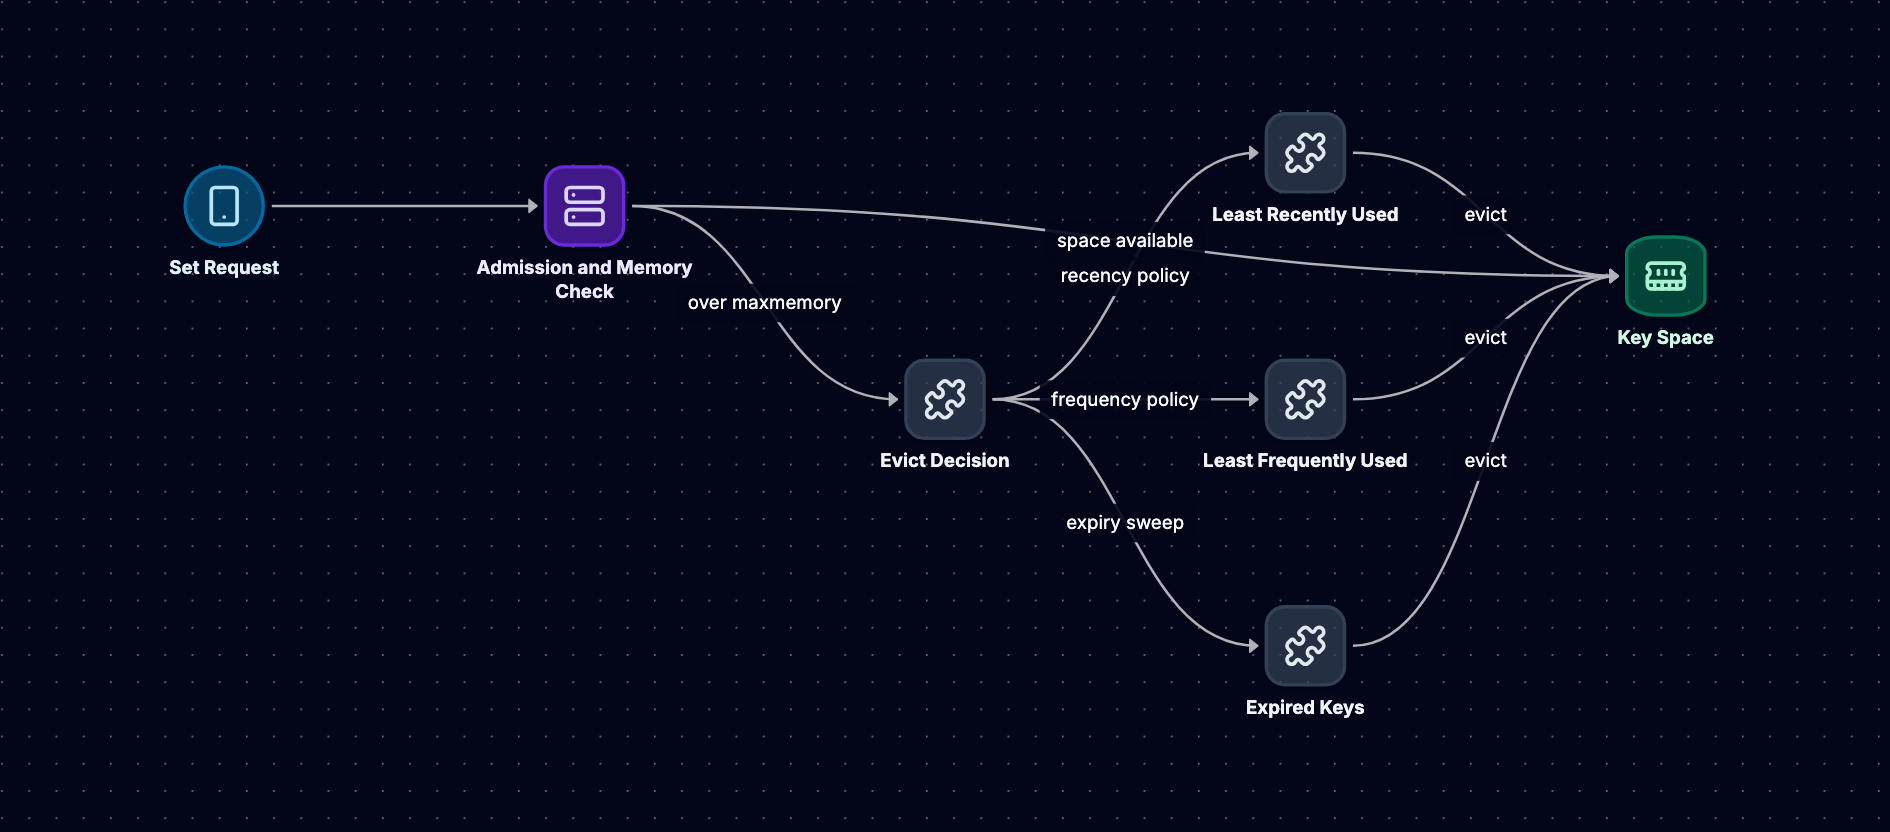
Unlike databases that can spill to disk, in-memory caches face hard memory limits. When memory fills, the cache must evict existing entries to make room for new ones. The eviction policy determines which entries to remove, directly impacting hit rate and application performance.
Least Recently Used (LRU)
LRU evicts the entry that hasn't been accessed for the longest time. The intuition is that recently accessed data is more likely to be accessed again soon (temporal locality). Perfect LRU requires a doubly-linked list and a hash map: every access moves the entry to the list head, and eviction removes from the tail. This is O(1) for both operations but requires per-key metadata and lock contention on every access.
Redis implements an approximated LRU that avoids these costs. According to the Redis LRU documentation, Redis samples a small number of keys (configurable, default 5) and evicts the least recently used among the sample. This reduces the problem from maintaining perfect global ordering to making locally optimal decisions.
The approximation quality improves with sample size:
maxmemory-samples 5   # Default, good balance
maxmemory-samples 10  # Better approximation, higher CPU cost
With a sample size of 5, Redis's approximation approaches true LRU behavior for most workloads. The LRU eviction documentation includes graphs showing the approximation quality improves significantly from samples of 3 to 10.
Least Frequently Used (LFU)
LFU tracks access frequency rather than recency. An entry accessed 1,000 times last week but not today has high frequency; an entry accessed once today has low frequency. LFU better handles scenarios where some data has enduring popularity while other data has brief spikes.
Redis's LFU implementation uses a probabilistic counter that decays over time. Each key stores a 24-bit LRU field, split into:
- 16 bits: Last decrement time (minutes precision)
- 8 bits: Logarithmic counter (0-255)
On each access, the counter increments probabilistically based on current value (higher values increment less often). Over time, the counter decays. This design prevents counters from growing unbounded while still distinguishing access patterns. According to Redis LFU documentation, you can tune decay rate and increment probability:
lfu-log-factor 10      # Counter increment probability
lfu-decay-time 1       # Decay rate in minutes
Time-To-Live (TTL) Expiration
TTL-based eviction removes entries that have exceeded their expiration time. Unlike LRU and LFU, which are reactive (triggered when memory is full), TTL expiration is proactive. Redis expires keys through two mechanisms:
- Lazy expiration: When a client accesses a key, Redis checks if it's expired before returning it
- Active expiration: Background process samples keys with TTLs and deletes expired ones
The Redis expiration documentation describes the active expiration algorithm: Redis samples 20 keys with TTLs every 100ms, deletes expired keys, and repeats if more than 25% were expired. This ensures expired keys don't accumulate while bounding CPU usage.
Eviction Policy Combinations
Redis offers eight eviction policies combining these strategies:
maxmemory-policy allkeys-lru      # LRU across all keys
maxmemory-policy allkeys-lfu      # LFU across all keys
maxmemory-policy volatile-lru     # LRU among keys with TTL
maxmemory-policy volatile-lfu     # LFU among keys with TTL
maxmemory-policy volatile-ttl     # Evict soonest expiring keys
maxmemory-policy allkeys-random   # Random eviction
maxmemory-policy volatile-random  # Random among keys with TTL
maxmemory-policy noeviction       # Return errors when full
The volatile-* policies only evict keys with TTLs, treating them as less important than keys without expiration. This supports mixed workloads: session data (with TTLs) can be evicted, while critical configuration data (without TTLs) remains resident.
Choosing between LRU and LFU depends on access patterns:
- LRU: Works well when recent access predicts future access (e.g., user sessions, trending content)
- LFU: Better when some data has stable long-term popularity (e.g., product catalog for popular items)
For workloads with both patterns, you might run separate cache clusters with different policies, routing requests based on data type.
Replication and Failover
Asynchronous Replication
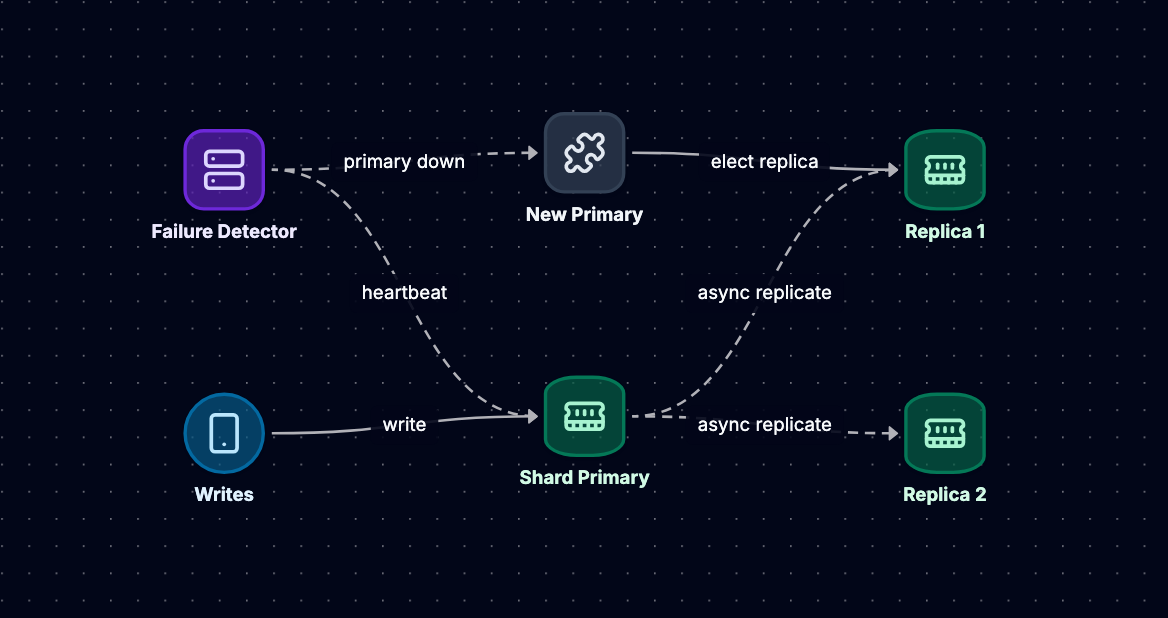
Redis Cluster uses asynchronous replication from master to replica nodes. When a client writes to a master:
- Master executes the write and returns success to the client
- Master propagates the write to replicas in the background
- Replicas apply the write and acknowledge to the master
This design prioritizes write latency over durability. The client receives confirmation before replicas persist the data, creating a window where data exists only on the master. If the master fails before replication completes, those writes are lost.
The Redis replication documentation explains that replication is non-blocking: the master continues serving requests while sending data to replicas. Replicas can also serve read requests during replication, though they may return stale data.
Synchronous Writes with WAIT
For operations requiring durability guarantees, Redis provides the WAIT command:
SET user:1000 "data"
WAIT 2 1000
According to the WAIT command documentation, this blocks until at least 2 replicas acknowledge the write or 1000ms elapses. WAIT returns the number of replicas that acknowledged, allowing applications to verify durability before proceeding.
However, WAIT has limitations: it doesn't guarantee data survives failover because Redis doesn't implement consensus. If a master fails after WAIT returns but before failover completes, and a replica that didn't receive the write gets promoted, the write is lost. WAIT only ensures replication happened, not that the replicated data will survive all failure scenarios.
Failure Detection via Gossip Protocol
Redis Cluster nodes communicate via a gossip protocol on a separate bus (default port + 10,000). Each node periodically:
- Sends PING messages to random nodes
- Receives PONG responses
- Exchanges cluster state (which nodes are up, which slots they own)
When a master doesn't respond to PINGs within cluster-node-timeout (default 15 seconds according to Redis Cluster configuration), the node marks it as PFAIL (Possible Failure). If a majority of masters report PFAIL for the same node, it's marked FAIL and failover begins.
This distributed failure detection prevents split-brain scenarios where network partitions cause multiple nodes to independently declare themselves master for the same slots.
Automatic Failover Process
When a master fails, Redis Cluster automatically promotes one of its replicas:
- Replicas of the failed master detect the failure
- Replica with the most recent replication offset requests votes
- Other masters vote (one vote per master)
- If the replica receives votes from a majority of masters, it promotes itself
- New master claims the failed master's slots and broadcasts configuration update
- Clients receive
MOVEDredirects and update their slot mappings
The Redis Cluster failover documentation notes that failover completes within cluster-node-timeout plus the time for configuration to propagate. For the default 15-second timeout, expect failover in under 30 seconds.
The replication offset ensures the most up-to-date replica gets promoted, minimizing data loss. However, any writes acknowledged by the master but not yet replicated are lost. This is the fundamental tradeoff of asynchronous replication: lower write latency at the cost of potential data loss during failures.
Manual Failover for Maintenance
For planned maintenance, Redis supports manual failover that minimizes data loss:
CLUSTER FAILOVER TAKEOVER
This command, executed on a replica, tells it to promote itself. Unlike automatic failover, manual failover waits for replication lag to reach zero before promotion, ensuring no data loss. According to the CLUSTER FAILOVER documentation, this enables zero-downtime upgrades: promote a replica, upgrade the old master, make it a replica of the new master, repeat.
Replica Migration
Redis Cluster supports replica migration: if a master has multiple replicas while another master has none, a replica can automatically migrate to provide redundancy for the under-replicated master. This self-healing behavior maintains cluster resilience even as nodes fail.
However, migration is conservative. According to the replica migration documentation, it only occurs when the source master has at least two replicas and the target master has zero. This prevents cascading migrations that could leave multiple masters under-replicated.
Cache Stampede and Thundering Herd
The Problem: Synchronized Misses
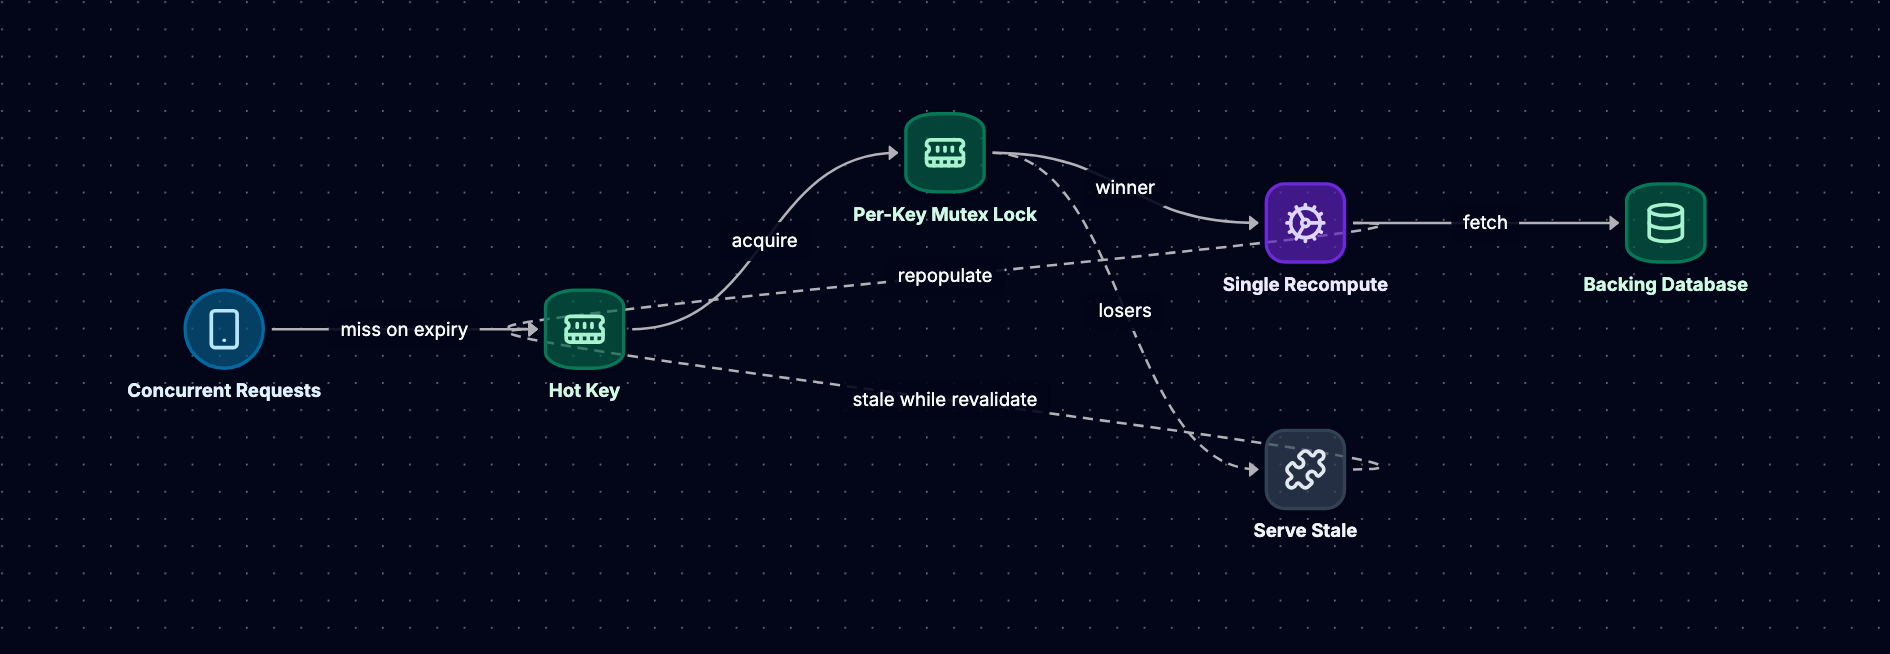
A cache stampede occurs when a popular key expires and multiple clients simultaneously request it. All clients experience cache misses, query the database, and attempt to populate the cache. The database receives a sudden spike of identical queries, potentially causing overload.
This is especially problematic for expensive queries (aggregations, joins, external API calls). If computing a value takes 500ms and 1,000 requests arrive during that window, you've amplified load 1,000x.
Probabilistic Early Expiration (XFetch)
One solution is to refresh cache entries before they expire. The XFetch algorithm uses probabilistic early expiration:
def get_with_early_expiration(key, ttl, beta=1.0):
    value, stored_at = cache.get(key)
    if value is None:
        return refresh_cache(key, ttl)

    # Probabilistically refresh based on time until expiration
    time_since_stored = now() - stored_at
    time_until_expiry = ttl - time_since_stored

    # More likely to refresh as expiration approaches
    if random() < beta * time_since_stored / ttl:
        return refresh_cache(key, ttl)

    return value
The beta parameter controls aggressiveness: higher values refresh earlier. This approach spreads refreshes over time rather than synchronizing them at expiration. Keys with higher access rates are more likely to get refreshed before expiration, as each access has a chance to trigger refresh.
The tradeoff is unnecessary refreshes: some keys get recomputed before expiration even if they wouldn't have been accessed again. Tune beta based on your miss cost versus refresh cost ratio.
Request Coalescing with Locking
Another approach uses distributed locks to ensure only one client recomputes a value:
def get_with_locking(key, ttl, lock_timeout=5):
    value = cache.get(key)
    if value is not None:
        return value

    lock_key = f"lock:{key}"
    if cache.set(lock_key, "1", nx=True, ex=lock_timeout):
        # This client won the lock, compute the value
        try:
            value = compute_expensive_value(key)
            cache.set(key, value, ex=ttl)
            return value
        finally:
            cache.delete(lock_key)
    else:
        # Another client is computing, wait briefly and retry
        time.sleep(0.1)
        return get_with_locking(key, ttl, lock_timeout)
This uses Redis's SET NX EX (set if not exists with expiration) to implement a distributed lock. The first client to acquire the lock computes the value while others wait. The lock timeout prevents deadlock if the computing client crashes.
The tradeoff is latency: waiting clients experience delays while the value is computed. For very expensive operations, this is preferable to stampeding the database. For cheaper operations, the coordination overhead might exceed the benefit.
Negative Caching
Not all stampedes involve database queries. Sometimes the absence of data causes problems. If clients repeatedly request a non-existent key, each request hits the database to confirm the key doesn't exist.
Negative caching stores a sentinel value indicating "this key doesn't exist":
def get_with_negative_cache(key, ttl=300, negative_ttl=60):
    value = cache.get(key)

    if value == "NEGATIVE_CACHE_SENTINEL":
        return None

    if value is not None:
        return value

    # Cache miss, check database
    value = database.get(key)

    if value is None:
        # Key doesn't exist, cache negative result with shorter TTL
        cache.set(key, "NEGATIVE_CACHE_SENTINEL", ex=negative_ttl)
        return None
    else:
        cache.set(key, value, ex=ttl)
        return value
Negative results typically use shorter TTLs because absence is less stable than presence: a key that doesn't exist now might be created soon. This pattern is particularly useful for user-generated content where clients might repeatedly check for new data that hasn't been created yet.
Layered Caching with Stale-While-Revalidate
A sophisticated approach serves stale data while asynchronously refreshing:
def get_with_stale_while_revalidate(key, ttl, grace_period=300):
    entry = cache.get(key)  # Returns (value, stored_at)

    if entry is None:
        # Hard miss, compute synchronously
        value = compute_expensive_value(key)
        cache.set(key, (value, now()), ex=ttl + grace_period)
        return value

    value, stored_at = entry
    age = now() - stored_at

    if age < ttl:
        # Fresh, return immediately
        return value
    elif age < ttl + grace_period:
        # Stale but within grace period, return and refresh async
        asyncio.create_task(refresh_async(key, ttl, grace_period))
        return value
    else:
        # Too stale, compute synchronously
        value = compute_expensive_value(key)
        cache.set(key, (value, now()), ex=ttl + grace_period)
        return value
This pattern provides the best user experience: most requests return immediately (either fresh or stale data), and only hard misses or very stale data trigger synchronous computation. The grace period must be tuned based on how much staleness your application tolerates.
Write-Through vs Write-Back
The Consistency Spectrum
Write strategies determine when cache and database synchronize, fundamentally trading consistency for performance. Your choice affects correctness, latency, durability, and operational complexity.
Write-Through: Synchronous Consistency
Write-through updates cache and database synchronously:
def write_through(key, value):
    # Write to database first
    database.set(key, value)

    # Then update cache
    cache.set(key, value)

    return value
The database write completes before the cache update. If the cache update fails, the database remains consistent and subsequent reads will populate the cache. Write-through guarantees cache and database never diverge beyond the write operation duration.
Advantages:
- Consistency: Cache always reflects committed database state
- Simplicity: No background processes or failure recovery logic needed
- Durability: Data persists to database before acknowledging the write
Disadvantages:
- Write latency: Every write pays database latency plus cache latency (typically 10-100ms for database, <1ms for cache)
- Write amplification: Every write hits both systems, doubling write load
- Availability: Database downtime blocks writes even if cache is healthy
Write-through works well for read-heavy workloads where write latency is acceptable and strong consistency is required. Financial transactions, user account data, and configuration management often use this pattern.
Write-Back (Write-Behind): Asynchronous Performance
Write-back updates cache immediately and asynchronously writes to the database:
def write_back(key, value):
    # Update cache immediately
    cache.set(key, value)

    # Queue database write for background processing
    write_queue.enqueue(key, value)

    return value
A background worker drains the queue:
def background_writer():
    while True:
        batch = write_queue.dequeue(batch_size=100)
        if batch:
            database.batch_write(batch)
Batching amortizes database write costs: 100 writes might complete in 50ms instead of 100 individual writes at 10ms each (1000ms total).
Advantages:
- Write latency: Returns after cache write only, typically sub-millisecond
- Write throughput: Batching reduces database load and improves throughput
- Availability: Writes succeed even during database degradation
Disadvantages:
- Data loss risk: Cache failure before database write loses data permanently
- Consistency lag: Database lags behind cache by queue depth × batch interval
- Complexity: Requires queue management, retry logic, and failure handling
Write-back suits write-heavy workloads where low latency matters more than immediate durability. Analytics events, user activity tracking, and metrics collection commonly use this pattern, often combined with periodic snapshots for durability.
Write-Around: Lazy Population
Write-around writes to the database without updating the cache:
def write_around(key, value):
    # Write to database only
    database.set(key, value)

    # Optionally invalidate cache entry
    cache.delete(key)

    return value
The next read will miss the cache and populate it from the database. This avoids cache pollution from write-once data that may never be read.
When to use:
- Bulk imports or batch updates that won't be immediately read
- Write-heavy keys where cache updates would thrash the cache
- Data with low read-after-write probability
Write-around is often combined with write-through: use write-through for hot data, write-around for cold data.
Hybrid Strategies: Refresh-Ahead
Some systems combine approaches based on access patterns. Refresh-ahead proactively updates cache before expiration for frequently accessed keys:
def refresh_ahead(key, ttl, refresh_threshold=0.8):
    entry = cache.get(key)  # Returns (value, stored_at)

    if entry is None:
        # Cache miss, read from database
        value = database.get(key)
        cache.set(key, (value, now()), ex=ttl)
        return value

    value, stored_at = entry
    age = now() - stored_at

    # If entry is nearing expiration and frequently accessed
    if age > ttl * refresh_threshold:
        # Trigger async refresh
        asyncio.create_task(refresh_from_database(key, ttl))

    return value
This maintains cache freshness for hot keys while avoiding stampedes, combining write-through's consistency with write-back's performance benefits for read-heavy workloads.
Choosing a Write Strategy
Your write strategy should align with application requirements:
| Requirement | Strategy |
|---|---|
| Strong consistency | Write-through |
| Low write latency | Write-back |
| High write throughput | Write-back with batching |
| Durability critical | Write-through or write-back with persistent queue |
| Read-heavy, write |